How to Access Regional eShops on the Nintendo Switch
One of the lovely things about the Switch is that it is accessible in most regions and languages, and I will tell you how to access regional eShops with no problem at all. First, let me just tell you that the Switch is region-free, and that is awesome. Secondly, you can access all the world’s eShops from a single Switch with no issues at all. Finally, there are ways to get credit for most of these regions as well, so you can properly buy games from the Americas, Europe, Japan, and other countries from the comfort of your own home.
I am going to give you a simple step-by-step process to make this easier for you. Thankfully, it is not difficult at all, and in a matter of minutes, you can access and play around with different eShops from around the world. Without further ado, let’s create some new accounts!
DISCLAIMER
You will need multiple accounts to access the different regions. For example, an American account is absolutely not able to look at the Japanese eShop. Once an account’s region has been determined, it cannot be changed. This means you will need one account per region that you want to access.
1. Create a Nintendo Account
In order to create a new Nintendo Network ID, you will first need to visit the following address:
Initially visiting this address will present you with the log in screen. Scroll down to the last option “Create a Nintendo Account” and click that box.
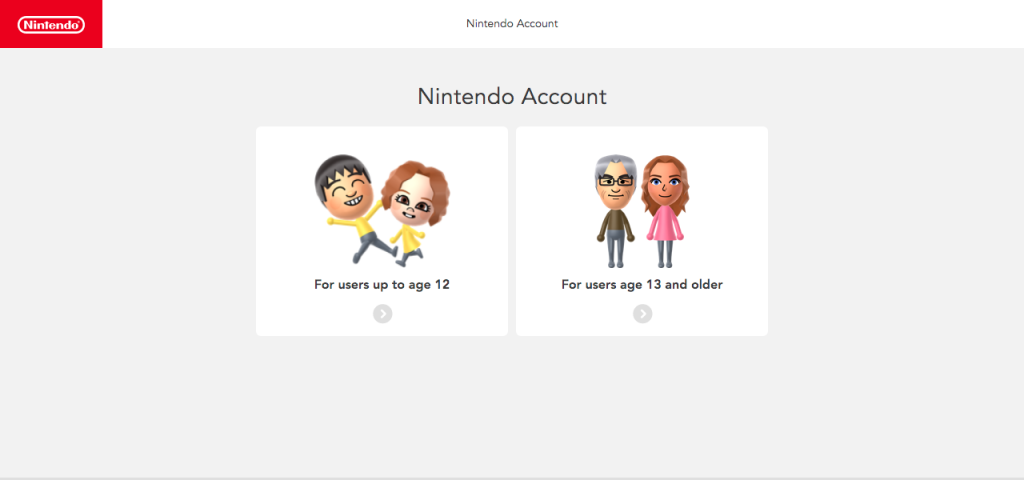
From here, you will be given the option to choose a child account or an adult account. If this is for your personal use, you may want to choose the adult account regardless, because choosing the child account will have restrictions and limitations when it comes to eShop access.
After choosing which account, you will then be presented with a screen that allows you to connect to a particular service (e.g. Google, Facebook, Twitter), but we want to ignore this and scroll down to the fields below to create a new account.
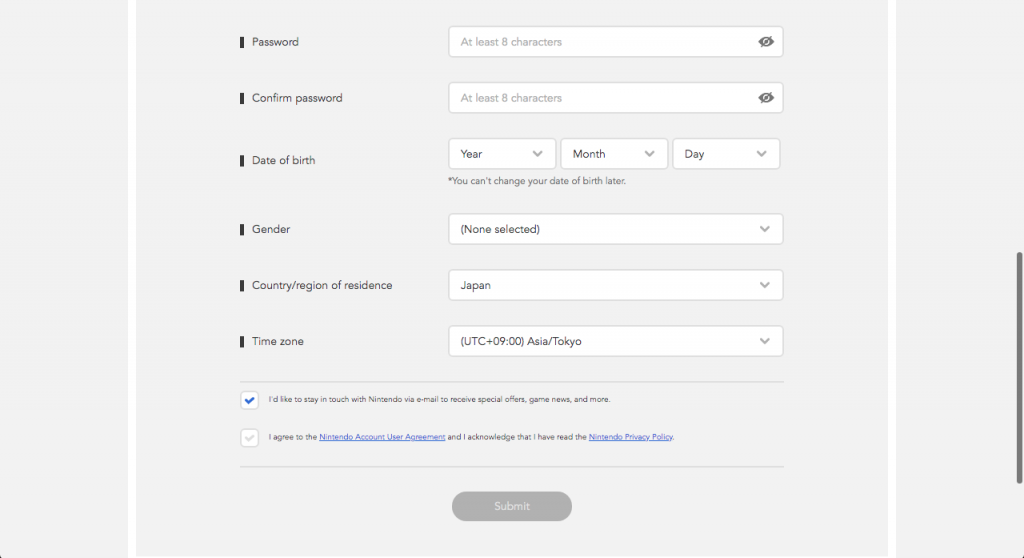
Fill out the information as you would normally, and please be sure to use a real email address. In order to confirm your new Nintendo Account, you will receive a verification code with the email that you attach to the new account.
For this example, we have chosen to select Japan as our Country/region of residence, but you are able to do this for any region. Just click the dropbox, and scroll to the country/region for the Switch eShops that you desire.
There is no need to worry about having a fake mailing address, as this process does not need those details. Once you submit the information, you will receive an email with the verification code, and you just simply need to insert that code into the box of the next screen.
2. Create New User(s)
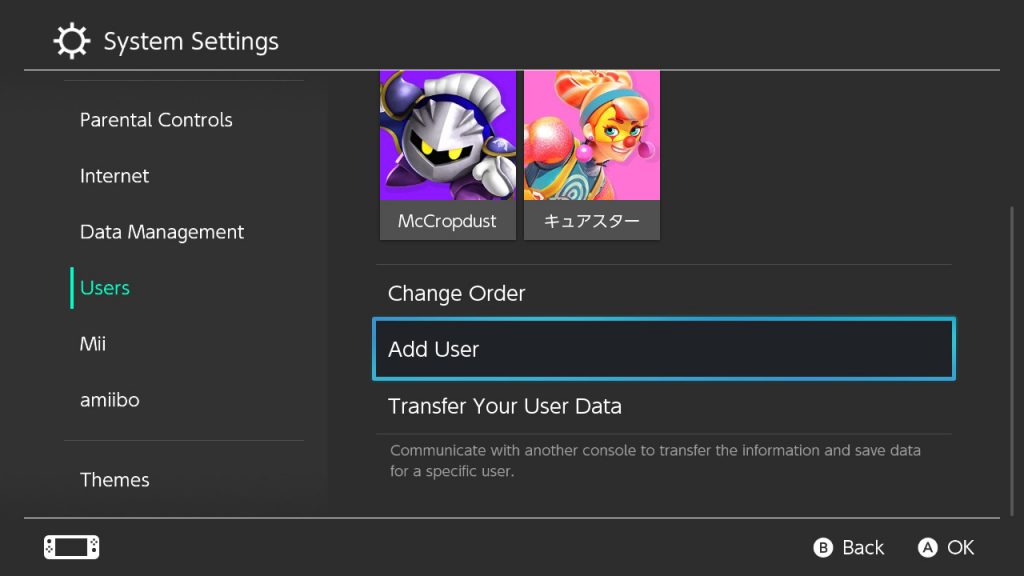
On your Nintendo Switch, you will need to create new users for each region you are planning to create Nintendo Accounts for. On your Switch console, head over to System Settings and scroll down to Users. From here, you need to select Add User.
You will be given the option to Create New User or Import User Data from Another Console. Obviously, we will be selecting Create New User.
You will then choose an icon for the user and enter a nickname. After this, you will be given the option to Link a Nintendo Account or do it later. If you followed this process, you should already have your Nintendo Account ready.
3. Link the Nintendo Account
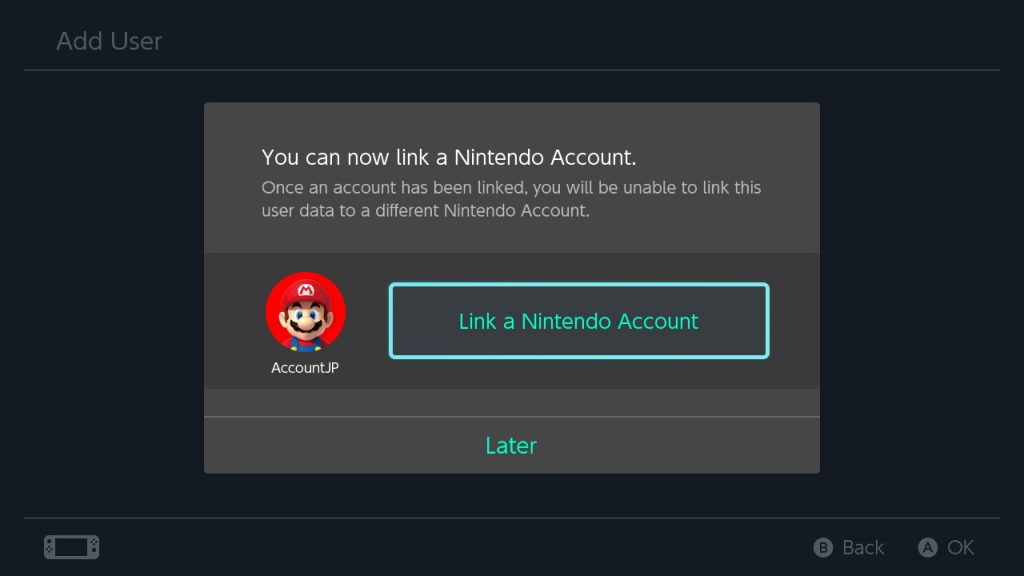
Now that you have created a Nintendo Account for your preferred region and a User for that Switch, it is time to unite the two into one.
If you are still on the screen after initially creating your New User, select the Link a Nintendo Account option on your Switch console. If you selected Later or want to use an existing user, select the user from the top of the Switch main menu and select Link Nintendo Account from pretty much any of the side options.
Once you select Link Nintendo Account, the Switch will redirect you to a browser that gives you the following options; Sign in using an e-mail address or sign-in ID, Sign in using an external account, or Create a new account.
For this process, we will be selecting the first option, Sign in using an e-mail address. You will simply plug in the email address and password of the Nintendo Account that you created, and voila! You have access to all a new Nintendo Switch eShop.
4. Accessing the eShop

Once you are back to the Switch’s main menu, you may now select eShop at the bottom and choose your newly made account from a different region, and that is how to access regional eShops on your Nintendo Switch.
Congratulations! Your Switch is now multi-regional. Pretty cool and simple, right? Let us know in the comments below if you have any questions.
Thank you for visiting Nintendo Link. We hope this How to Access Regional eShops guide was helpful and informative, and we hope even more that this opens up a new world of possibilities for you and your Switch! Happy gaming, everyone.
What's Your Reaction?
My name is Jason Capp. I am a husband, father, son, and brother, and I am a gamer, a writer, and a wannabe pro wrestler. It is hard to erase the smile on this simple man.


